.png)
Preface
This guide is intended for technicians who install Miralix Webchat Service. The technician should be trained as an IT Support technician, or have equivalent qualifications. In addition, the technician should have relevant knowledge of Microsoft Azure, Microsoft Azure CLI and Microsoft Azure Bot Resources.
Miralix Chat Service sends and receives messages to and from your Webchat channel towards Miralix Desktop, which grants the possibility of chatting with customers through a website.
The Miralix Chat service settings, can be configured with Miralix Wrench, under the “Proxy” tab in the “Chat” sub-tab, see the Userguide for Miralix Wrench if necessary.
GDPR - General Data Protection Regulation
The General Data Protection Regulation (GDPR), commonly referred to as the data protection regulation, means that customers who have Miralix software installed must decide on the scope and retention period of data storage. All Miralix customers are offered a data processing agreement, as Miralix generally has no obligations regarding this data storage.
Prerequisites for BOT framework/Miralix Chat service
In order for BOT framework/Miralix Chat service to function correctly, some prerequisites must be in place.
Licenses
In order to use Webchat on Miralix Licens version 1, the following licenses are required:
|
Licens nummer |
Licens type |
|
1955 |
Miralix Agent Omni Add-on |
|
4101 |
Miralix Omni Channel (Web Chat) |
In order to use Webchat on the Miralix Licens version 2, the following licenses are required:
|
Licens nummer |
Licens type |
|
1933 |
Miralix CX Cloud Digital Web Chat - Add-on |
.Net
.NET 8.0 Runtime 64bit + ASP.NET Core Runtime 64bit Installed on the Miralix Server, with Miralix Chat Service.
MS SQL server
There must be a Microsoft SQL Server or Microsoft SQL Server Express installed.
See the document Miralix Systemrequirements for further information.
-
The MiralixGreenbox database must be installed/imported.
Miralix Server components
On the server side, the following must at a minimum be installed:
-
Miralix Proxy Service. See the guide Installation Miralix Proxy Service.
-
Miralix Chat service. See the guide installation Miralix Chat service.
Microsoft Azure Bot Resources
An Azure user account must be used with the necessary permissions to create an Azure Bot, App Service, App Service Plan, Resource Group, App Registration, and add these resources to an Azure Subscription.
This is required so the Azure Bot can receive and send messages to and from the Miralix Chat service and the webchat website.
HTML template, JavaScript and bot configuration file
Miralix has prepared an HTML Webchat Template file and a JavaScript file, which make it easy to implement a range of functionalities in the webchat using method calls.
In addition, Azure Bot configuration files, named “Miralix.WebChatBot.X.X.X.zip”, will also be provided and must be uploaded to the Azure Bot.
Note: When updating the Miralix Chat Service, the JavaScript file and the .zip file must also be updated.
The Webchat template is built in HTML format and is primarily intended for testing the Webchat setup. It can be used advantageously to understand and test Webchat functionalities.
These files will, by default, be placed in the installation folder for the Miralix Chat Service.
Example:
C:\Program Files\Miralix\Miralix Chat Service
Note: Please be aware that this Webchat template has been prepared for testing purposes, and Miralix disclaims any responsibility if it is used in production.
Creating Azure Bot Resources in Microsoft Azure
To create the required Azure resources, Azure CLI is used. See, for example, the guide Create an Azure Bot resource via Azure CLI:
Creating Azure Bot Resources in Azure via Azure CLI
-
Download and Install Azure CLI:
https://docs.microsoft.com/en-us/cli/azure/install-azure-cli-windows?tabs=azure-cli -
Log in to Azure via Azure CLI through PowerShell by running the command “az login” in the PowerShell window.
A browser window will now open, where you must sign in using the user account that will be used to create the Azure resources.
After a successful login, information about the subscriptions associated with the user account will be displayed.
See Figure 1.
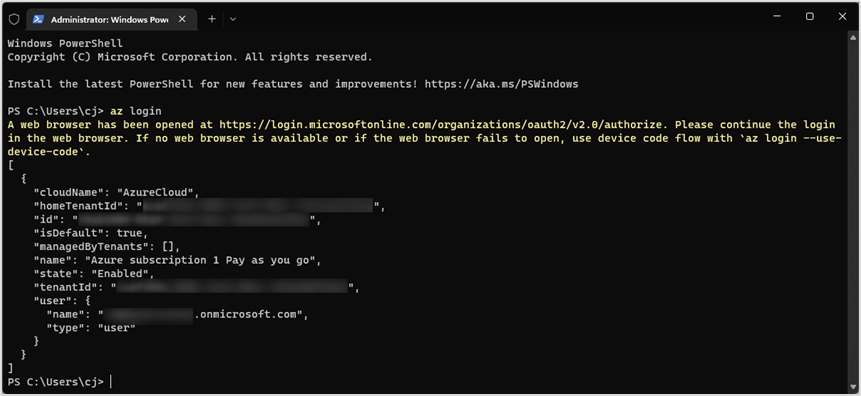
Figure 1
3. If the user account has access to several subscriptions (Can be seen if there are several values inside ”{}”) then the subscription ID is defined with the following Command, otherwise continue to the next step.
az account set --subscription "<Subscription ID>"
Example:
az account set --subscription "56x63x1x-04x9-43x9-x71x-34xx6x417462"
4. Create an “App Registration” for the Bot:
az ad app create --display-name "<Bot_App_Registration_Name>" --sign-in-audience "AzureADandPersonalMicrosoftAccount"
Example:
az ad app create --display-name "MiralixWebChatBotAppRegistration" --sign-in-audience "AzureADandPersonalMicrosoftAccount"
When the setup is completed, information regarding the newly created ‘'App registration’' will be shown in Powershell. See figure 2.
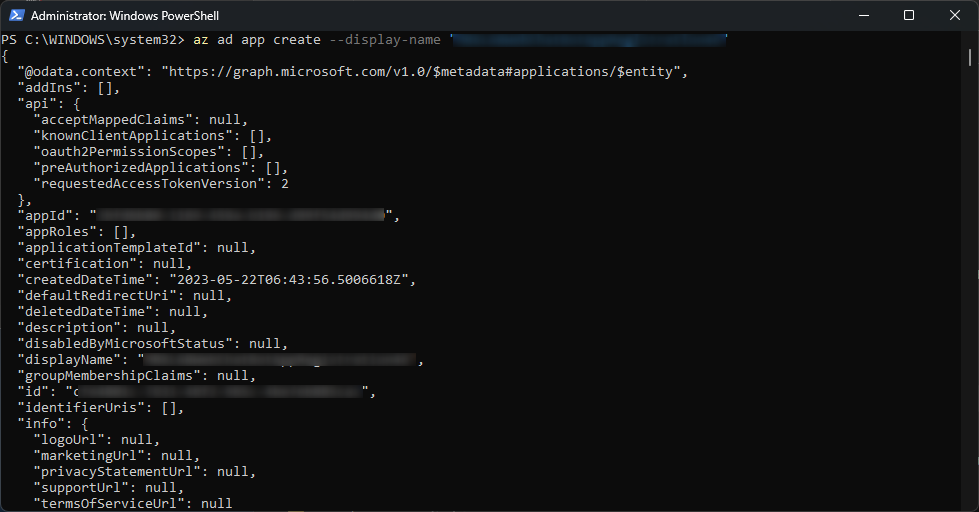
Figure 2
Save the value from ”appId”:
5. Create ”App Secret” (Secret/Password) for ”App Registration”, which will be used by Azure Bot Resources later. See figure 3.
az ad app credential reset --id <AppRegistrationId>
Example:
az ad app credential reset --id 0a5x4xx7-299x-3x6x-x760-xx3x660x00xx
Figure 3
Save Secret/Password for “App registration”.
6. Create Azure Resources Azure Bot, App Service, App Service Plan, and a resource group.
For more information see: https://learn.microsoft.com/en-us/cli/azure/deployment/sub?view=azure-cli-latest#az-deployment-sub-create-examples
Important!
The following command is a single line without line breaks!
Create Azure App Service, Azure App Service Plan, and Azure Resource Group
az deployment sub create --location westeurope --template-uri "https://raw.githubusercontent.com/microsoft/botbuilder-dotnet/main/generators/dotnet-templates/Microsoft.BotFramework.CSharp.EchoBot/content/DeploymentTemplates/DeployWithNewResourceGroup/template-BotApp-new-rg.json" --parameters '{\"groupName\": {\"value\": \"<GroupName>\"}, \"groupLocation\": {\"value\": \"westeurope\"}, \"appServiceName\": {\"value\": \"<AppServiceName>\"}, \"appServicePlanName\": {\"value\": \"<AzureServiceAppPlanName>\"}, \"appServicePlanLocation\": {\"value\": \"westeurope\"}, \"appServicePlanSku\": {\"value\": {\"name\": \"S1\", \"tier\": \"Standard\", \"size\": \"S1\", \"family\": \"S\",\"capacity\": 1}},\"appType\": {\"value\": \"MultiTenant\"},\"appId\": {\"value\": \"<AppID>\"},\"appSecret\": {\"value\": \"<AppSecret>\"},\"UMSIName\": {\"value\": \"\"},\"UMSIResourceGroupName\": {\"value\": \"\"},\"tenantId\": {\"value\": \"\"} }'
Explanation of the parameters
--location
The server location for the resources.
As a general recommendation, we recommend placing the resources in the same region. In this example, westeurope is used, as this region contains the required services and provides good response times from Denmark.
--parameters
Contains the parameters required to create the App Service.
Note:
The content must be escaped as a JSON string. https://learn.microsoft.com/en-us/cli/azure/deployment/sub?view=azure-cli-latest#az-deployment-sub-create-examples
groupName
The name of the new Resource Group that will be created in Azure.
groupLocation
The server location for the different resources.
As a general recommendation, we recommend placing the resources in the same region. In this example, westeurope is used as the region, as it contains the required services and provides good response times from Denmark.
appServiceName
The name of the App Service that will be created in Azure.
appServicePlanName
The name of the App Service Plan that will be created in Azure.
To use an already existing App Service Plan, see:
https://docs.microsoft.com/en-us/azure/bot-service/bot-builder-deploy-az-cli?view=azure-bot-service-4.0&tabs=multitenant%2Cnewgroup%2Ccsharp
appServicePlanLocation
The server location for the different resources.
As a general recommendation, we recommend placing the resources in the same region. In this example, westeurope is used as the region, as it contains the required services and provides good response times from Denmark.
appServicePlanSku
The pricing tier for the Azure web service.
Use S1 for the standard tier. This is recommended to avoid limitations related to the number of messages sent to and from the bot/service.
Alternatively, the free tier, F0, can be used.
To view the limitations of the free tier, see:
https://azure.microsoft.com/en-us/pricing/details/bot-services/#pricing
appId:
App Id from the App Registration.
appSecret:
App Secret/Password for theApp registration.
For further information see: https://learn.microsoft.com/en-us/cli/azure/deployment/sub?view=azure-cli-latest#az-deployment-sub-create-examples
Example:
az deployment sub create --location westeurope --template-uri "https://raw.githubusercontent.com/microsoft/botbuilder-dotnet/main/generators/dotnet-templates/Microsoft.BotFramework.CSharp.EchoBot/content/DeploymentTemplates/DeployWithNewResourceGroup/template-BotApp-new-rg.json" --parameters '{\"groupName\": {\"value\": \"MiralixWebChatBotAzureResourceGroupeName\"}, \"groupLocation\": {\"value\": \"westeurope\"}, \"appServiceName\": {\"value\": \"MiralixWebChatBotAppServiceName\"}, \"appServicePlanName\": {\"value\": \"MiralixWebChatBotAppServicePlanName\"}, \"appServicePlanLocation\": {\"value\": \"westeurope\"}, \"appServicePlanSku\": {\"value\": {\"name\": \"S1\", \"tier\": \"Standard\", \"size\": \"S1\", \"family\": \"S\",\"capacity\": 1}},\"appType\": {\"value\": \"MultiTenant\"},\"appId\": {\"value\": \"0a5x4xx7-299x-3x6x-x760-xx3x660x00xx\"},\"appSecret\": {\"value\": \"XXXXX~XXXXXXXXXXXXXXXXXXXXXXXXXXXXX\"},\"UMSIName\": {\"value\": \"\"},\"UMSIResourceGroupName\": {\"value\": \"\"},\"tenantId\": {\"value\": \"\"} }'
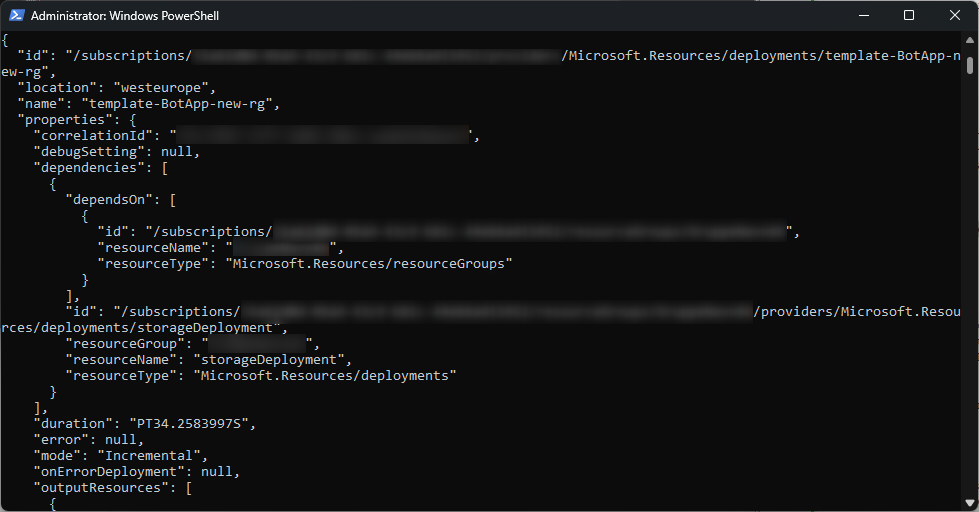
After this, the command output will show whether the Azure resources were created successfully.
See Figure 4.
Figur 4
Create Azure App Bot
az deployment sub create --location westeurope --template-uri "https://raw.githubusercontent.com/microsoft/botbuilder-dotnet/main/generators/dotnet-templates/Microsoft.BotFramework.CSharp.EchoBot/content/DeploymentTemplates/DeployWithNewResourceGroup/template-AzureBot-new-rg.json" --parameters '{\"groupName\": {\"value\": \"<GroupName>\"},\"groupLocation\": {\"value\": \"westeurope\"},\"azureBotId\": {\"value\": \"<AzureBotId>\"},\"azureBotSku\": {\"value\": \"S1\"},\"azureBotRegion\": {\"value\": \"global\"},\"botEndpoint\": {\"value\": \"https://<AppServiceNavn>.azurewebsites.net/api/messages\"},\"appType\": {\"value\": \"MultiTenant\"},\"appId\": {\"value\": \"<AppRegistrationID>\"},\"UMSIName\": {\"value\": \"\"},\"UMSIResourceGroupName\": {\"value\": \"\"},\"tenantId\": {\"value\": \"\"} }'
Explanation of the Parameters.
--location
The server location for the different resources.
As a general recommendation, we recommend placing the resources in the same region. In this example, westeurope is used as the region, as it contains the required services and provides good response times from Denmark.
--parameters
Contains the parameters required to create the Azure Bot.
Note:
The content must be escaped as a JSON string.https://learn.microsoft.com/en-us/cli/azure/deployment/sub?view=azure-cli-latest#az-deployment-sub-create-examples
groupName
The name of the new Resource Group that will be created in Azure.
groupLocation
The server location for the different resources.
As a general recommendation, we recommend placing the resources in the same region. In this example, westeurope is used as the region, as it contains the required services and provides good response times from Denmark.
azureBotId
The name of the Azure Bot.
azureBotSku
The pricing tier for the Azure Bot.
Use S1 for the standard tier. This is recommended to avoid limitations related to the number of messages sent to and from the bot/service.
Alternatively, the free tier, F0, can be used.
To view the limitations of the free tier, see:
https://azure.microsoft.com/en-us/pricing/details/bot-services/#pricing
botEndpoint
The URL for the bot, for example:
<https://<AppServiceName>>.azurewebsites.net/api/messages
appId
The App ID from the App Registration.
For additional information, see: https://learn.microsoft.com/en-us/cli/azure/deployment/sub?view=azure-cli-latest#az-deployment-sub-create-examples
Example:
az deployment sub create --location westeurope --template-uri "https://raw.githubusercontent.com/microsoft/botbuilder-dotnet/main/generators/dotnet-templates/Microsoft.BotFramework.CSharp.EchoBot/content/DeploymentTemplates/DeployWithNewResourceGroup/template-AzureBot-new-rg.json" --parameters '{\"groupName\": {\"value\": \"MiralixWebChatBotAzureResourceGroupeName\"},\"groupLocation\": {\"value\": \"westeurope\"},\"azureBotId\": {\"value\": \"MiralixWebChatBotName\"},\"azureBotSku\": {\"value\": \"S1\"},\"azureBotRegion\": {\"value\": \"global\"},\"botEndpoint\": {\"value\": \"https://MiralixWebChatBotName.azurewebsites.net/api/messages\"},\"appType\": {\"value\": \"MultiTenant\"},\"appId\": {\"value\": \"0a5x4xx7-299x-3x6x-x760-xx3x660x00xx\"},\"UMSIName\": {\"value\": \"\"},\"UMSIResourceGroupName\": {\"value\": \"\"},\"tenantId\": {\"value\": \"\"} }'
Subsequent Configuration of Azure Bot Resources via the Azure Portal
-
Log in to the Azure Portal (https://portal.azure.com) with an administrator account as shown in figure 5.
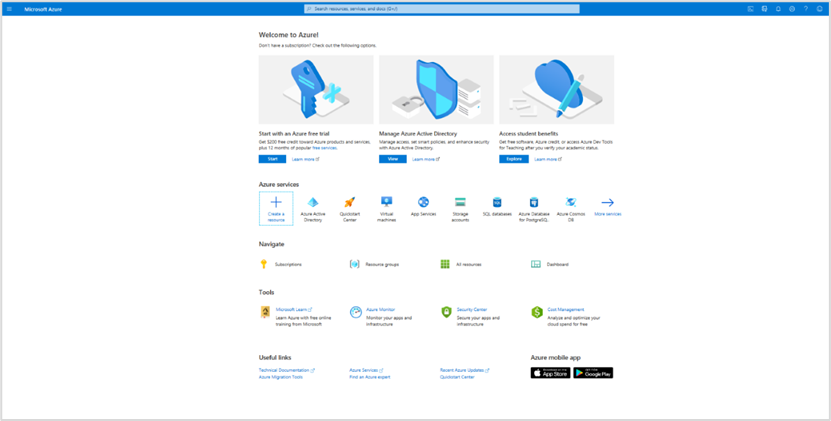
Figure 5
2. Search or navigate to the newly created resources. See figure 6.
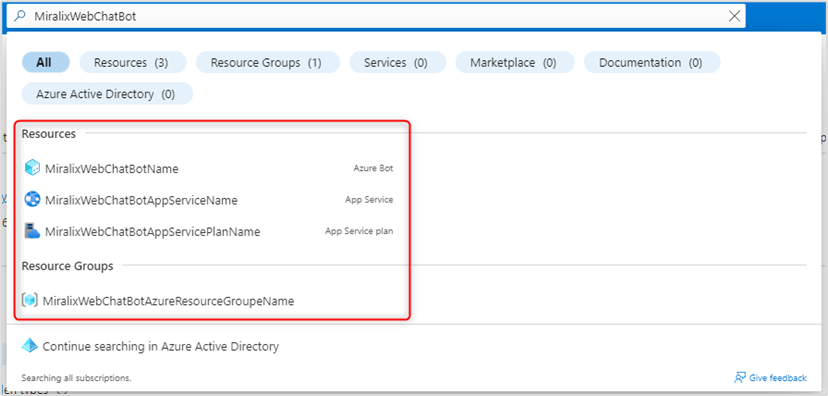
Figure 6
3. Access the App Service resource, scroll down in the left-hand sidebar, and click Advanced Tools. Then click Go →.
See Figure 7.
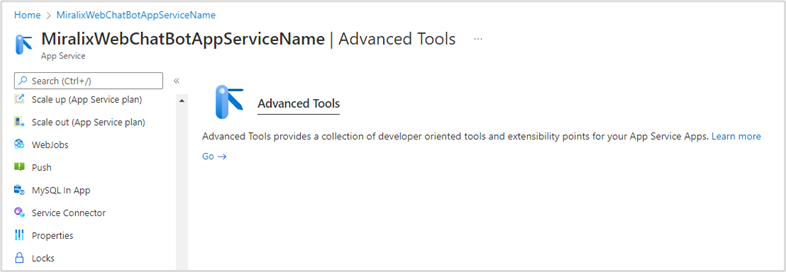
Figure 7
4. Kudu will now open. Kudu is the engine behind a number of Azure App Service features related to source control-based deployment, as well as other deployment methods for synchronization.
Go to Tools and select Zip Push Deploy. Then delete all items in the table on the page, so the page appears as shown in Figure 8.
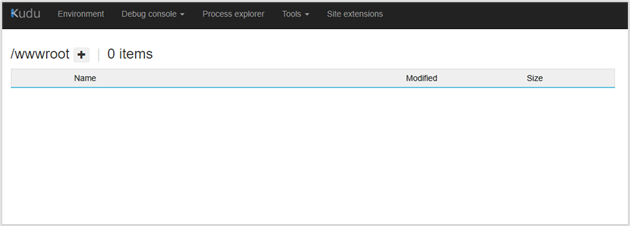
Figure 8
When the table is empty, insert/upload the ZIP file “Miralix.WebChatBot{version number}.zip” onto the page.
The ZIP file can be found on the Miralix server after the Miralix Chat Service has been installed. The drag-and-drop function on the Kudu website can be used.
Wait until everything has been transferred and “Deployment successful” is shown as the final status.
See Figure 9.
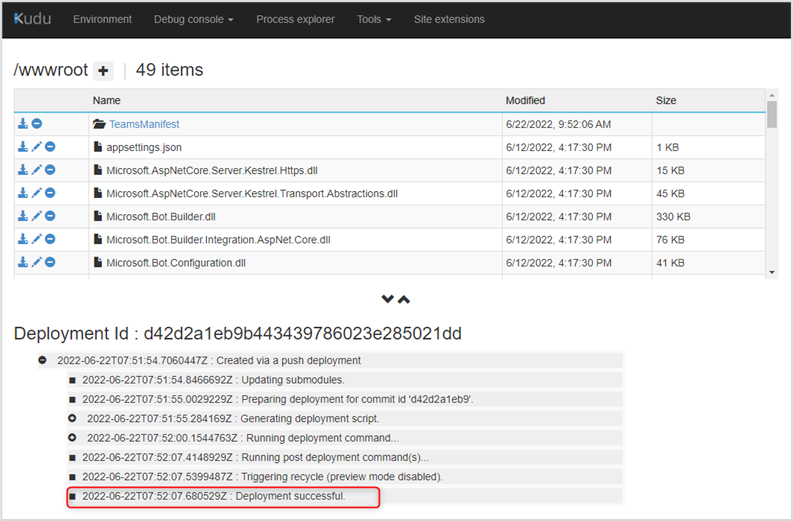
Figure 9
5. Close the page and return to the App Service in the Azure portal. Under Overview at the top of the left-hand side menu, click the Restart button in the top menu bar.
Establish a Connection from Miralix to the Azure Bot
Once the Azure Bot has been created, a connection to the Azure Bot can be established through multiple channels. For this, a Channel Site Secret Key is required.
Note: It is important to use the secret keys from a Site and not the secret keys from a Channel. Otherwise, the webchat will not work.
-
Navigate to Channels in the side menu in Azure under the relevant Azure Bot resource.
Here, all active channels for the Azure Bot will be displayed. If this is the first time Azure is being used, only the Web Chat channel will be enabled.
Create a Direct Line channel by clicking Direct Line under Available Channels.
See Figure 10.
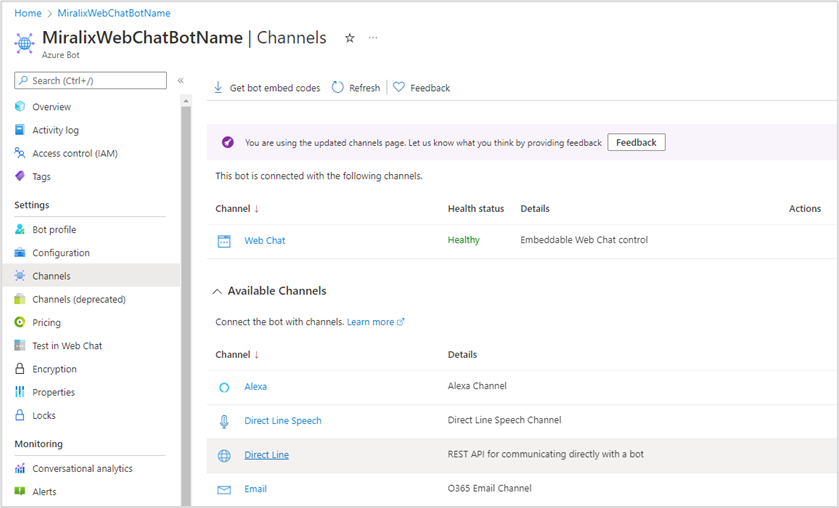
Figure 10
2. Click ”Default_Site”. See figure 11.
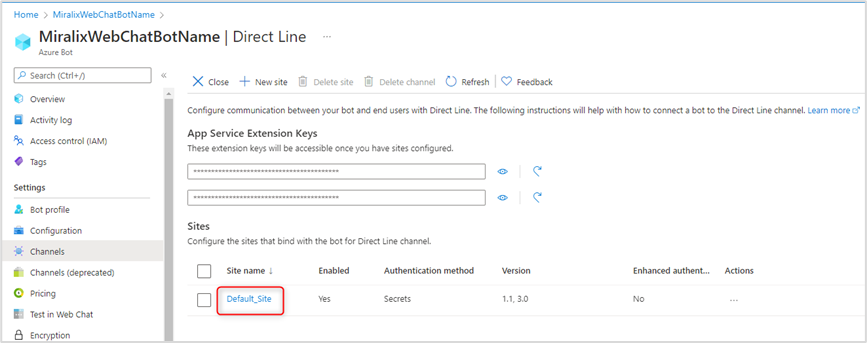
Figure 11
-
Click Show next to one of the fields, and the Secret Key will be displayed.
Save these Secret Keys for later configuration in Miralix Wrench.
See Figure 12.
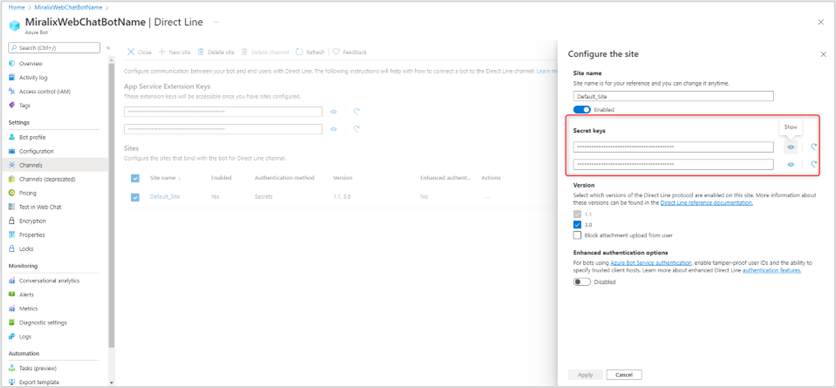
Figure 12
4. This Secret Key is used to establish the connection from Miralix to the Azure Bot and to connect Miralix with other users who use the same Azure Bot.
In Wrench, configure the solution to use this Secret Key together with the Bot ID (botID) from the Azure Bot resource in order to activate webchat.
Save the settings by clicking Save Settings.
To establish the connection, the WebChat service must be restarted. Click Restart WebChat service.
See Figure 13.
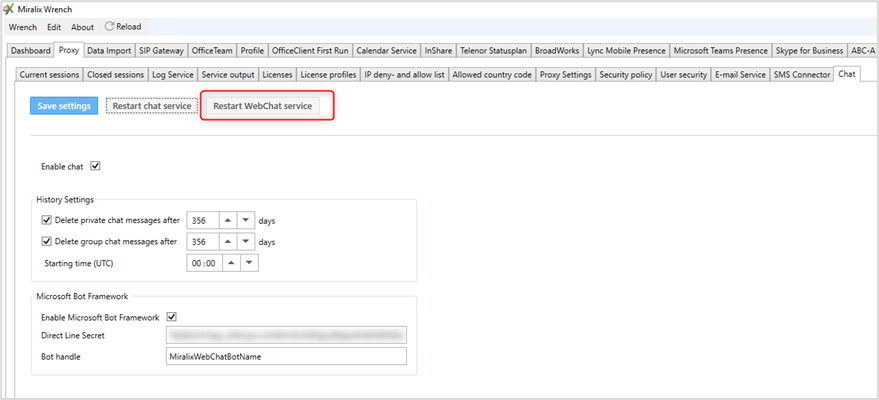
Figure 13
Test the Connection to the Azure Bot
In the same way that a connection is created between Miralix Desktop and the Azure Bot, a Secret Key must also be used to create a connection between the Azure Bot and the website’s webchat.
To create the connection between the Azure Bot and Webchat, refer to the guide Connect a bot to Web Chat.» https://docs.microsoft.com/en-us/azure/bot-service/bot-service-channel-connect-webchat?view=azure-bot-service-4.0.
The webchat can be integrated on the website using either JavaScript or React.
Integrate the JavaScript file with the Azure Web Chat channel
Go to the Web Chat channel under Channels on the Azure Bot in the Azure portal. See Figure 14.
Copy one of the two Secret Keys from the Web Chat Site, as shown in Figure 15. This key must be inserted into the JavaScript file.
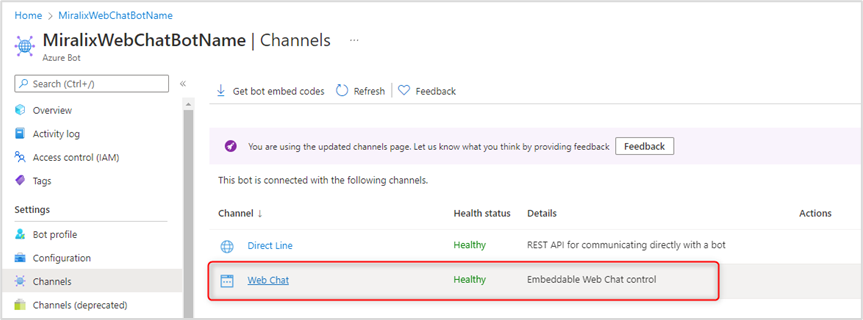
Figure 14
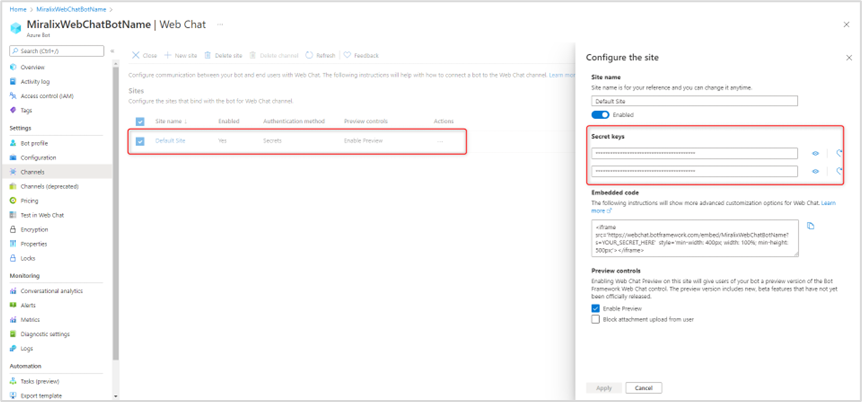
Figure 15
-
To start a chat, the Azure Bot Framework requires a Webchat Secret Key. It is recommended that this Secret Key is kept secure, so that others cannot obtain it and use it to connect to the same chat connection.
In the JavaScript file provided by Miralix, the Webchat Secret Key must be entered directly into the JavaScript code on the line marked in Figure 16.
After this, a token will be generated to start a conversation through the Microsoft Bot Framework Direct Line API.
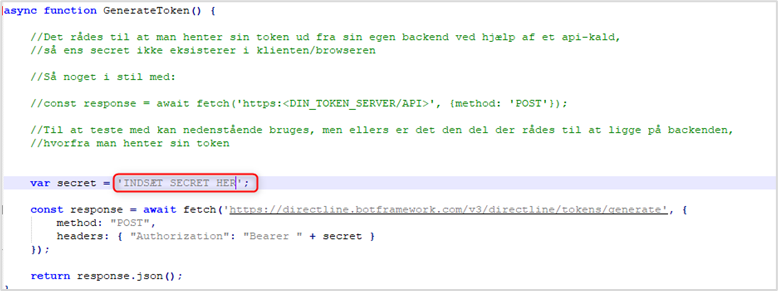
Figure 16
Note: It is recommended to implement the above in your own backend. For example, instead of exposing the Secret Key in the browser, an API call can be used to retrieve a valid token, thereby keeping the Secret Key hidden from the browser.
To start the webchat, the renderWebChat method must be called. To stop the connection to the Azure Bot/conversation, the disconnectWebChat method must be called, after which the conversation is ended.
To route chats to different queues, the setWebChatRoutingString method is called with a string as a parameter in the WebChat template, as shown in Figure 17. This string is sent when a new conversation is created and must therefore be set before calling the renderWebChat method in the JavaScript file. The Miralix Chat Service can then listen for this string in a routing list in the Miralix Supervisor Add-on and place the chat in the desired webchat queue.

Figure 17
Option to fill in user information before chat start and send it with messages for display in Miralix Desktop.
-
In the WebChat template, a form named webChatForm is used. When this form is submitted, the values from the form are inserted into a key-value pair array in JavaScript in the handleSubmit method.
This array will be received in Miralix Desktop when a WebChat request is created. This happens in the renderWebChat method, which is called at the end.
The key will be the name parameter from the input tags, as shown in Figure 18, and the value will be the actual input entered by the user in the relevant input field.
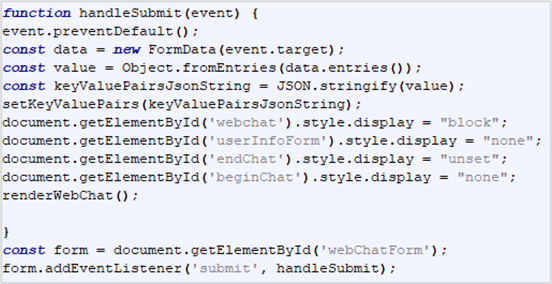
Figure 18
2. In the WebChat template, the entered data is now sent to Miralix as metadata.
An example of this can be seen in Figure 19.
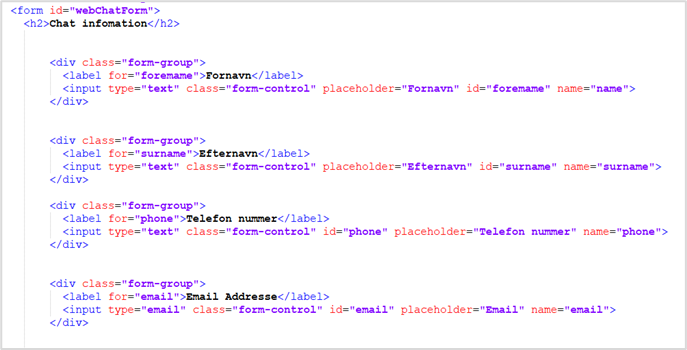
Figure 19
3. The following must be created before an input menu can be created. The order is as follows, and only needs to be completed the first time:
Enable Webchat in Miralix Wrench. See the Wrench guide for further instructions.
Add a webchat queue.
Add a webchat identification.
Add webchat texts.
Add a webchat menu.
Add a webchat input menu.
Optionally, add a webchat schedule.
For the above to work, one or more parameters must be added in Miralix Supervisor under the input menu associated with the Webchat flow.
In Webchat header, select Web chat metadata parameter from the dropdown menu to access the values sent with the metadata from the webchat. Then click the Insert button.
See Figure 20.
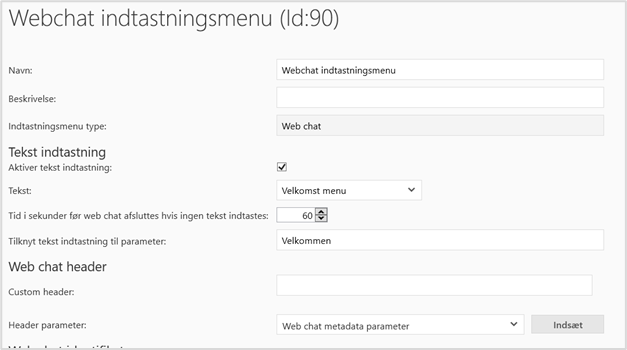
Figure 20
4. After this, a parameter will be added to the Custom header text field. Inside the parentheses, enter the name of the metadata parameter whose value should be displayed in the header.
As shown in Figure 21, this example displays first name, last name, email, and phone number.
The value must match the value used in the WebChat template/website.

Figure 21
5. It is possible to add text in front of the Web chat metadata parameter.
This text will be displayed in the header as written in the text field, while only the values of the metadata properties will be shown in the header, as shown in Figure 22.
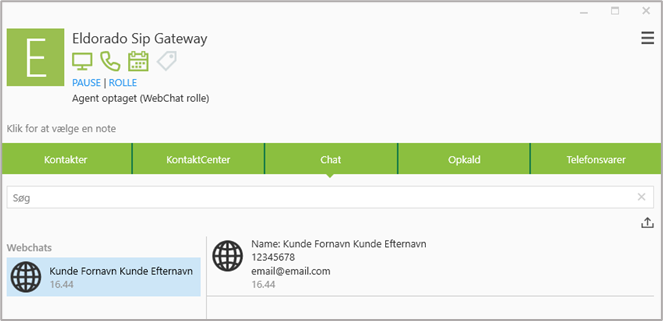
Figure 22
Webchat with React:
In the first version, Miralix has not provided an example React file for implementing the webchat.
You can use the JavaScript file, together with the link below, as inspiration for integrating the webchat with React.
See Examples of integration using React »https://github.com/microsoft/BotFramework-WebChat
Styling the Webchat
It is possible to style the webchat depending on how the webchat is set up on your website.
In general, React provides more styling options compared to CDN-based implementation, but there are many options available overall.
Figure 23 shows what the two different implementation options support.
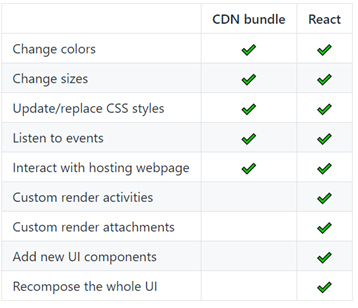
Figure 23
In the associated JavaScript file provided by Miralix, all styling for the webchat itself can be found in the styleOptions object.